Indigo is one of the first dyes man ever used to color fabrics and it’ll probably be one of the last. The pigment is made from fermented leaves off of the indigo plant, which has flourished in India, China, Japan, Egypt, Africa, and Central South America. But indigo’s beauty doesn’t come from how hardy and colorfast a dye it is, in fact it’s the exact opposite. The simple scuffs and scrapes that come with regular wear cause indigo to slough off and lead to individualized wear patterns, like denim fades.
Many of our favorite brands have put a new spin on classic items by giving them an indigo bath, like the Red Wing x Tenue de Nîmes Indigo Boot or Iron Heart’s Indigo Henley.
Part of the reason for indigo’s longevity is that dyeing with it is a relatively cheap and easy process. Easy enough, in fact, that you could do it with an afternoon in your backyard! So we’d like to take the mystery out of every denimhead’s favorite pigment and show you how to blue yourself at home.
Materials

This recipe will dye roughly 15 t-shirts or 7 pants/sweatshirts:
- Five gallon bucket with lid
- Dyeing agents (available separately or as a kit)
- 20 grams pre-reduced indigo granules
- 150 grams thiourea dioxide (thiox)
- 100 grams soda ash
- Rubber gloves
- Clothesline with clothespins
- Stick long enough to reach the bottom of the 5 gallon bucket
- Wet non-synthetic things to dye (cotton, wool, linen, leather, etc.) plus test scraps

No, that’s not dog poop. I just had my lawn aerated, thank you for noticing.
For this batch we’re going to be dipping wool rag socks, a short sleeve oxford cloth shirt, khaki duck chinos, a terry cloth sweatshirt, a plain white tee, and a baseball cap (a last second addition and thus not pictured).
1. Prep the Dye

Fill your 5 gallon bucket with 4 gallons of warm tap water.

Like this? Read these:
Add the indigo, thiox, and soda ash.

Stir for several minutes. It’ll take a while for all of the chemicals to dissolve within the water. You should have a marble-metallic type sheen across the solution’s surface when it’s ready.

Cover the bucket and let it sit for 20 minutes. You can use this time to set up your clothesline and wet your clothes down or watch our Norman Porter video five times.
2. Giving it the Dip

Your dyeing solution should be a a dark yellow-green color when you remove the lid.

Check how the dye is working with a test scrap before dipping any of your garments. It’ll be a light green when it first comes out. Don’t worry; the fabric will turn that dark indigo color we all know and love as it oxidizes over the next 10-15 minutes. Here’s the same scrap not five minutes later:

If you’re satisfied with the look of your test scrap, start with your first item. Make sure it’s thoroughly wet before you add it to the indigo or else it won’t dye evenly.

Squeeze out all the excess air and water as you dip your item. You’ll want it as thoroughly saturated with the stuff as possible but be careful not to not let it touch the bottom, there’s most likely undissolved sediment down there and your item won’t dye evenly.

Once your item is soaked to your satisfaction, hang it up on the clothesline to oxidize.

Squeezing the air out of your clothes can create concentrated bubbles of oxidized indigo, which can make your item not dye evenly. Be sure to scoop them out and discard before moving on to the next piece.

After you’ve dipped all of your items, give them a few minutes to oxidize on the clothesline. You’ll probably want to do several more dips but you need to wait until all of the green has turned blue first or else–you guessed it–it won’t dye evenly.

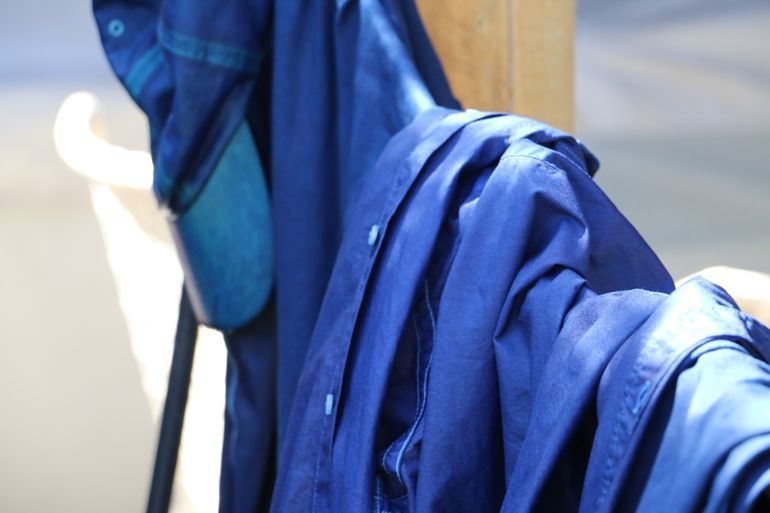
The drippy ends of the bottom of your garments will be the last to turn, but be sure you also check the inside hems where fabric may have stuck together and prevented oxidization, like the turquoise patch on the sweatshirt above. Also, note that indigo will not adhere to synthetic materials like the nylon thread in the sweatshirt which will give you some neat contrast stitching.

Most items will require several dips to achieve a deep and uniform color. Repeat all steps above until you reach a satisfying level of indigo-ness, for me that was around 5 dips total.
3. Rinsing and Clean up

If you have any dye left over you can cap it and set aside for use at a later date, it should last about a month before becoming fully oxidized. The dye is also non-toxic so if you have too little to save or just don’t care to, you can pour it out on your lawn or down the drain.

So now you’ve got a heap of dripping blue clothes. Even after drying, they’re still going to be super-saturated with indigo and give you a crazy amount of crocking.

Give them a quick bucket rinse to get rid of the excess dye.

Again, aerated lawn, not dog poop.
Look at all the blue that would’ve ended up on your shoes, sofa, or skin. Even though we’ve washed them, everything we’ve dyed is still a looooong ways from being colorfast. Make sure you wash them separately until you’re sure they’ve stopped bleeding.

All that’s left is to let them dry, throw them on, and you’re ready for a high-class night out in Alberta!