Learning how to patch your garments by hand can be a real springboard to making them last longer, look cooler, and completely unique to you. It requires minimal materials, equipment, skill, and ambition — but it can yield amazing results if done with enough care.
Today, we’ll be showing you an easy way to patch up holes using a simple but effective method that will add some visual flair as well as reinforce and repair your garment.
This guide is written by our very own Jack Van Leeuwen, who is a maestro when it comes to garment repair. He actually has his own business that specializes in the mending of vintage garments, which can be found on Instagram @luckylostrepairs.
Can You Patch?
Most any hole can be hand patched, regardless of size, shape, or location, so long as you have enough fabric and thread to patch it. So don’t be shy to take on large knee rips, elbow holes, or crotch blows. If it’s your first time hand patching a garment, I’d recommend starting with a smaller hole. but one of the beauties of hand patching is it’s not a very invasive repair. Therefore, if you’re not happy with your first go you can pull the thread out and start over as many times as you like!
What You Need
A major reason I love hand patching so much is you only need a few supplies and you can do it most anywhere. Here’s what you’ll need:
- Thread
- Needles
- Scrap fabric
- Pins
- Shears/Scissors
- Thread snips
- Iron
Thread

Sashiko Thread. $4.95 from Wawak.
Thread is a nice place to start, as it will dictate the sort of needle you need. If you want a heartier, more visible mend, go for sashiko threads. These are typically all cotton and sturdy enough to mend heavier denim and canvas fabrics. I recently came across this site and I like it as a one-stop shop for thread and needles. Here are some sashiko threads from them.
You can also find them at most specialty craft shops and don’t be afraid to buy different colorways beyond the standard white!

Guttermann Natural Cotton thread in Burlap Beige. $9.95 from Amazon.
Alternatively —as I used for this example project — the client asked me to match the original 50’s style home repairs of the garment, so I used a fine all-cotton thread from Gutermann. You can find their thread at most major and specialty craft shops, but above is the Burlap Beige thread I enjoy using for old-style repairs, as it has that vintage look.
Needles

Olympus Sashiko Hand Needles, $2.69 from Wawak.
Once you pick your thread type, you can get into the needles. For sashiko thread, sashiko needles are, of course, ideal. They are strong and have an extremely sharp point perfect for those heavyweight fabrics. Wawak has a nice set but you can also find them at most specialty sewing craft shops.
Like this? Read these:


Clover Gold Eye Hand Embroidery Needles. $1.66 for 16 from Wawak.
For hand stitching with a finer thread, I enjoy embroidery needles as they’re designed for hand stitching. There are so many options out there but I like the look of the above Clover needles, as I tend to use shorter needles with smaller eyes when working with the fine Gutermann thread.
Scrap Fabric

Kiriko Patch Kit, available for $25 from Kiriko Made.
The third key supply is the scrap of fabric you plan to use to patch the hole. Here, I like to get thrifty. Whether that’s using one old pair of jeans to save many, picking up a pair from a thrift shop to dissect, or sourcing from a surplus fabric supply store. Look in both your wardrobe and your local area to see what’s available.
It’s important that you choose a patch that is significantly bigger than the hole, as you want to patch an area much larger to help reduce tension. Typically, I try to match the fabric as closely as I can for a repair: fade, weight, texture, etc. but who am I to stifle creativity? It’s fun to use contrasting fabric patches, what you have available to you, or to source beautiful fabrics like the above patch kits from Kiriko.
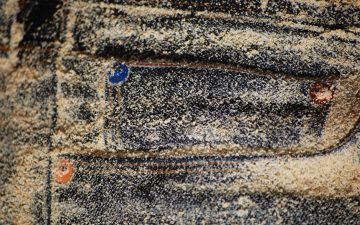
Pins

Grabbit Steel Pins, 1 1/2″, 80 count. $1.98 from Wawak.
A set of fabric pins or safety pins will prove useful, as well, for holding your repair in place while you stitch it. I enjoy the ball pins with bright colors but as always, do you!
Scissors

Gingher Knife Edge Serrated Bent Trimmers – 8″. $29.95 from Wawak.
Investing in a decent pair of scissors or shears will come in handy to cut your fabric cleanly. Again, Wawak has a nice selection of shears.
Thread Snips

Thrifty Thread Snips. Available for $2.98 from Wawak.
Thread snips are useful for cutting your thread at the start and end when you go to tie off knots.
Iron

Lastly — and not required but helpful — an iron. Wawak has a slew of industrial-grade irons if you feel like sewing is your next big thing, but I use a simple home iron for all my repairs, which you can find at any craft or department store.
Steps
Now for the fun part.
Step 1:
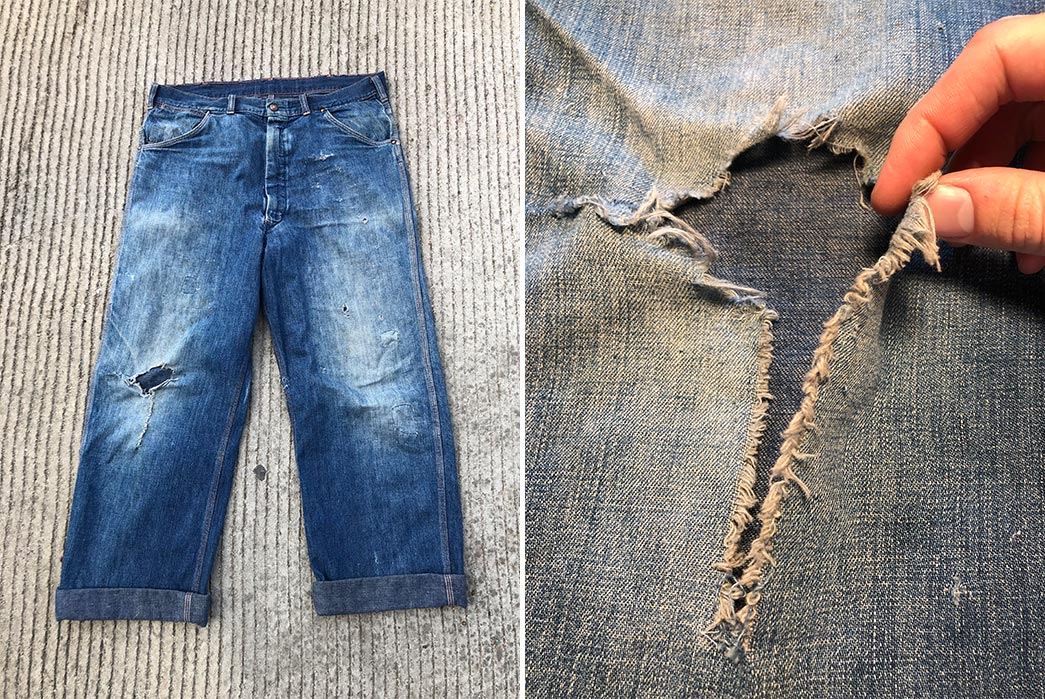
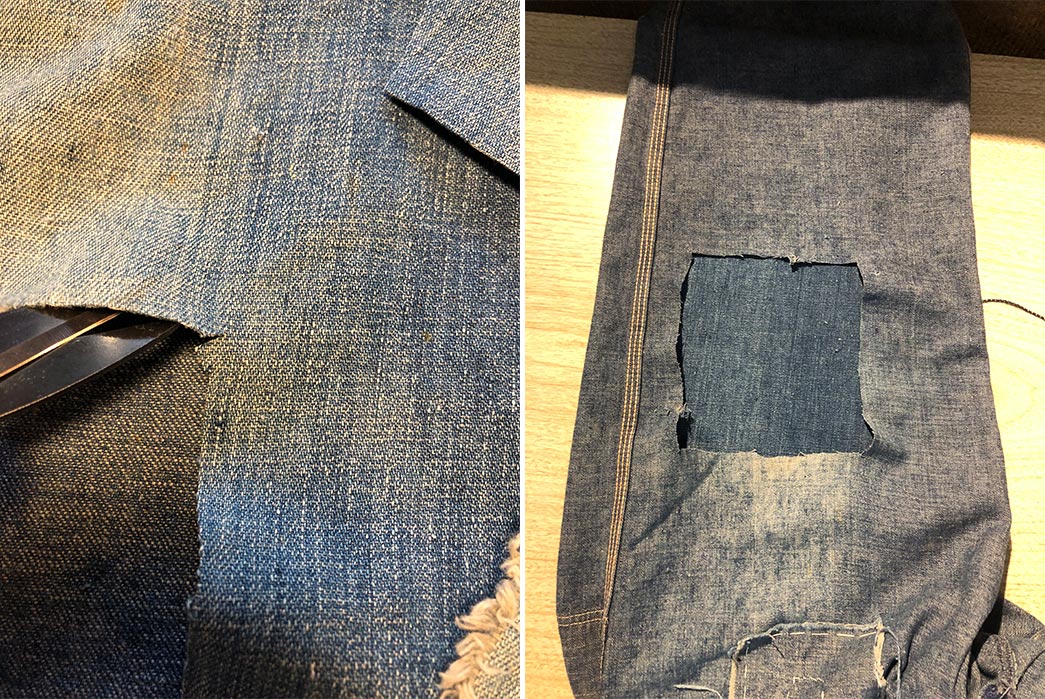
To start, identify the hole you want to patch. For this example, the client brought me a beautiful pair of 1950s Strong and Reliable brand denim work pants with a hole in the knee, and a tear stemming from this hole. This tear is a perfect case for nipping your holes in the bud, — once the knee hole formed, it continued to rip with wear.
Step 2:
This brings us to step two, prepping your hole. Since this example has a hole with a rip, I cut the hole to make it more of a square, which for whatever reason, feels a touch more pleasing to the eye for me than an oblong shape (above).

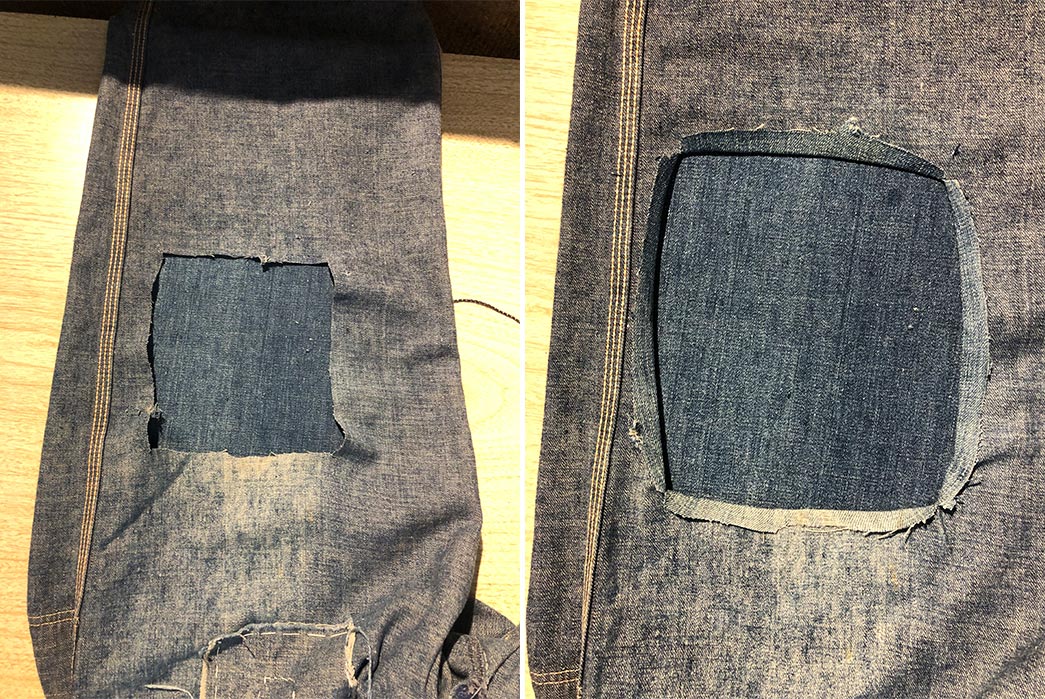
From here I snip each of the four corners, maybe a quarter to half an inch, and turn the pants inside out to hem the edges. From here, you’ll want to warm that iron up and use it to fold the four edges down. Pull and curl the edges near the corners back so your four snips aren’t showing, which will give your patch a clean look. Now turn it back right side out and you’re ready to cut your scrap fabric.
Step 3 –
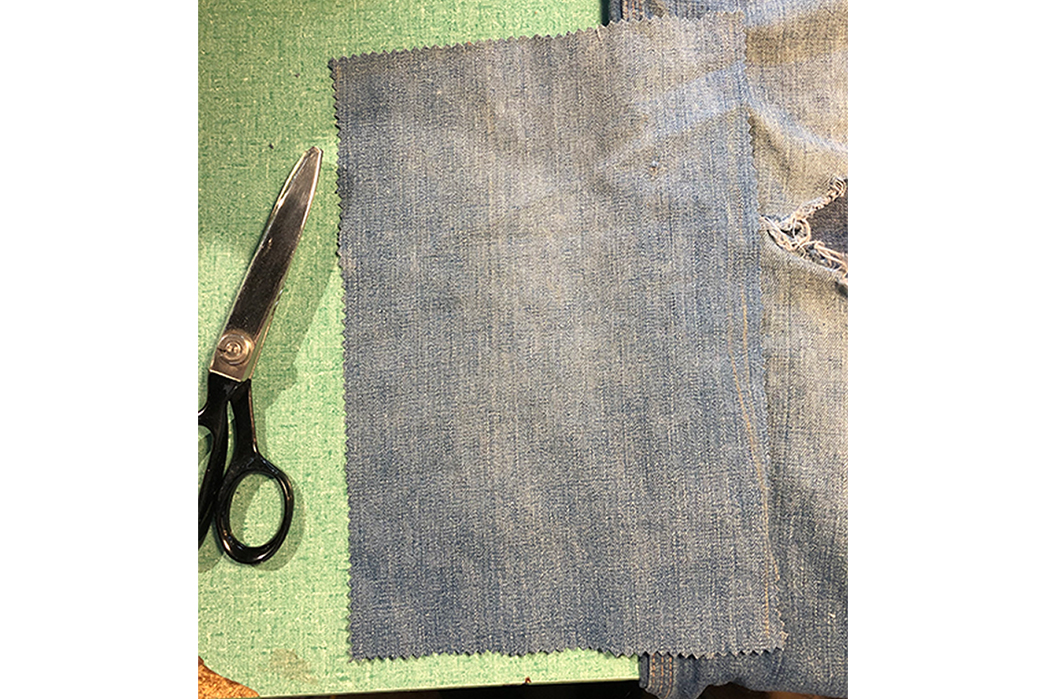
As explained above, cut your scrap a good bit larger than the hole. The larger you cut, the more you can back the hole, which will make for a more lasting repair. You can also prep your scrap further by serging the edge or cutting it with pinking shears to slow down the fraying of your patch scrap. This isn’t required, though.
Step 4:
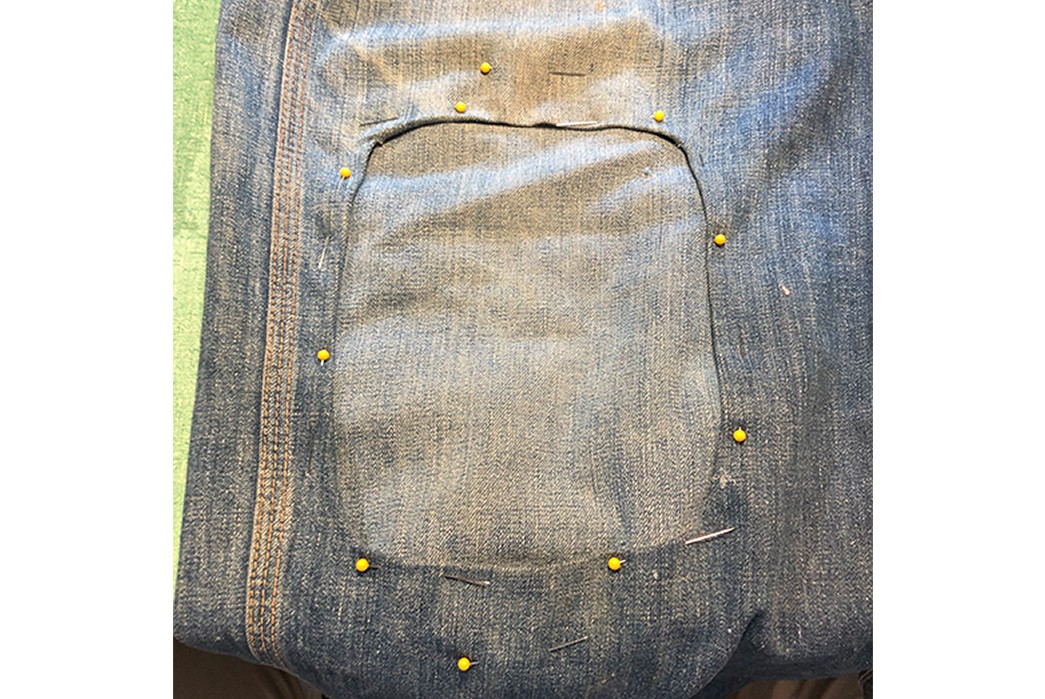
From here, you want to slot your scrap behind the hole. I like to match the grain and twill lines as best I can. You also want to make sure the patch is as centered behind the hole as possible, which you can do inside out if you’re having trouble getting it centered, or I like to feel the edge of the fabric and scoot it around until it feels and looks centered.
Once in place, pin the edges of the hole to your scrap. I also like to pin above and below so the excess fabric doesn’t get folded or caught while I stitch around the hole. Take your time here, proper prep will set you up for a cleaner repair overall.
Step 5:

Now you’re ready to cut your thread and thread your needle. Typically, I cut a thread one to two feet long, thread the eye of the needle, and tie the two ends so my thread is doubled. You can use a single strand, especially with the sashiko thread, just make sure you give the end a few ties to form a knot big enough that the end of your thread doesn’t slip through.
To note, you can cut your thread longer, but I’ve found that a very long thread strand is more likely to tangle as you sew. You’ve been warned!
Step 6:
Time for the stitching! You’ll actually learn two stitching techniques in this tutorial and while they are by far the most simplistic they are also the ones I use most frequently.
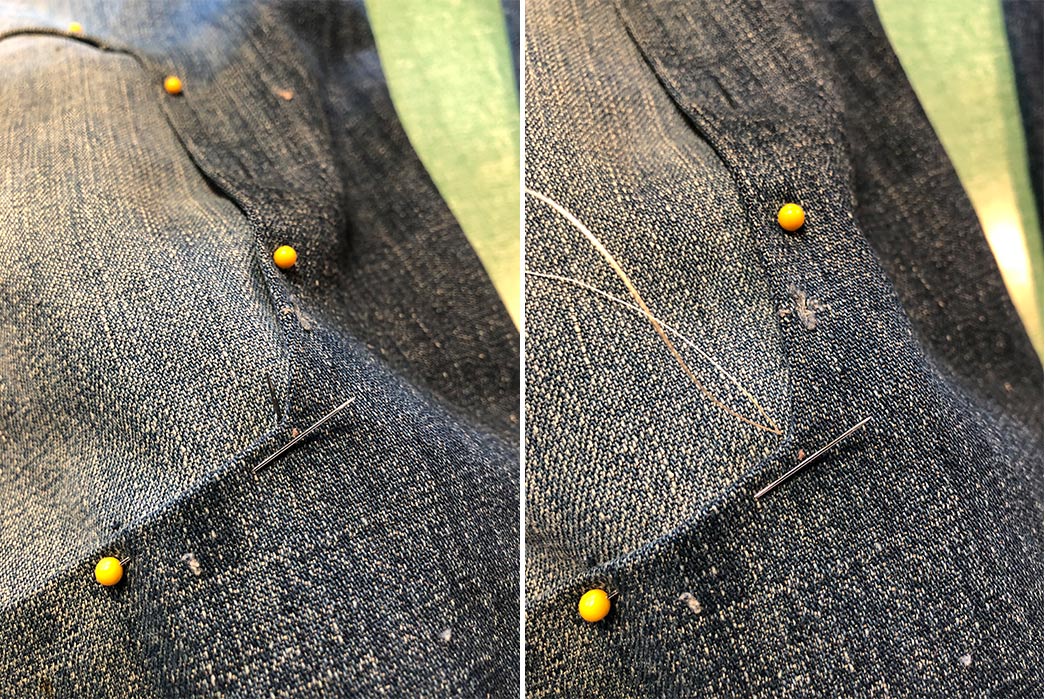
First is the whip stitch. Now I’ve seen people do this a number of ways but my preferred method is to feed the needle from the inside, through your scrap piece and the garment, as close to the folded edge as possible. Pulling it all the way through until you feel your knot hit the back of the scrap, then feeding your needle into the folded edge as close to where you first pierced the scrap as possible.
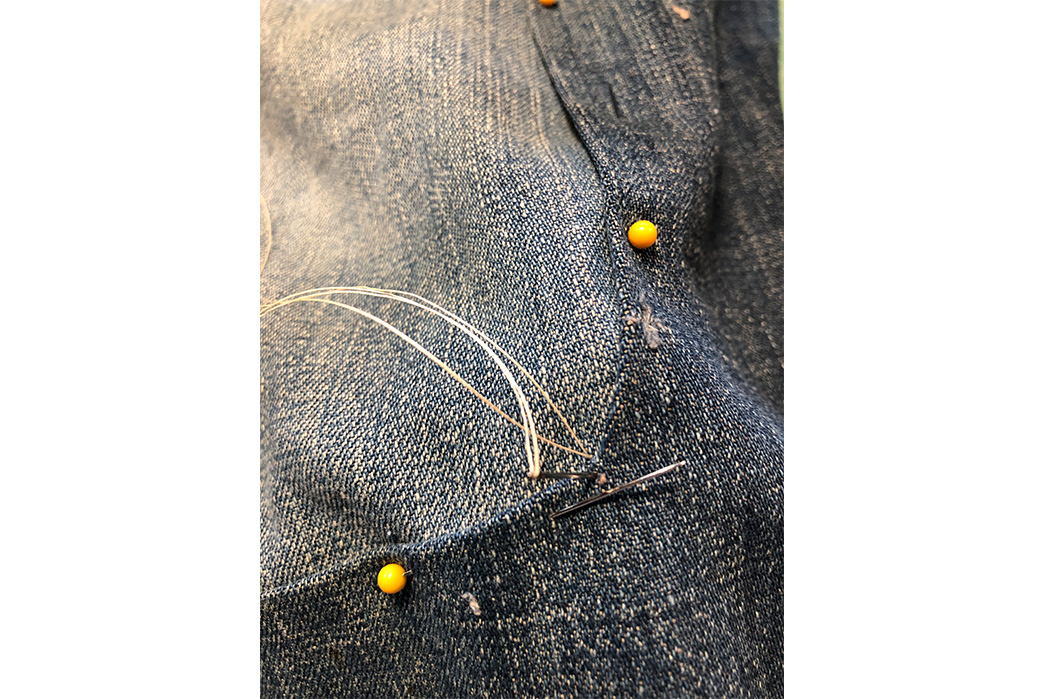
And there you have your first whip stitch! Feel free to practice on a scrap piece of fabric before or redo stitches you aren’t happy with. Again, it’s a less invasive repair so you can redo it over and over until you’re happy with it.
Step 7:

Now it’s a rinse-and-repeat process around the edge of your hole. One tip to keep the threads from tangling is to hold the loop with one hand while you pull it back through underneath with the other hand.
Another tip is to try and get a whip stitch right in those corners and pulled tight, as they have a way of unfolding:
Step 9:

For this project, I cut and tied off at least two or three strands of thread to get me all around.
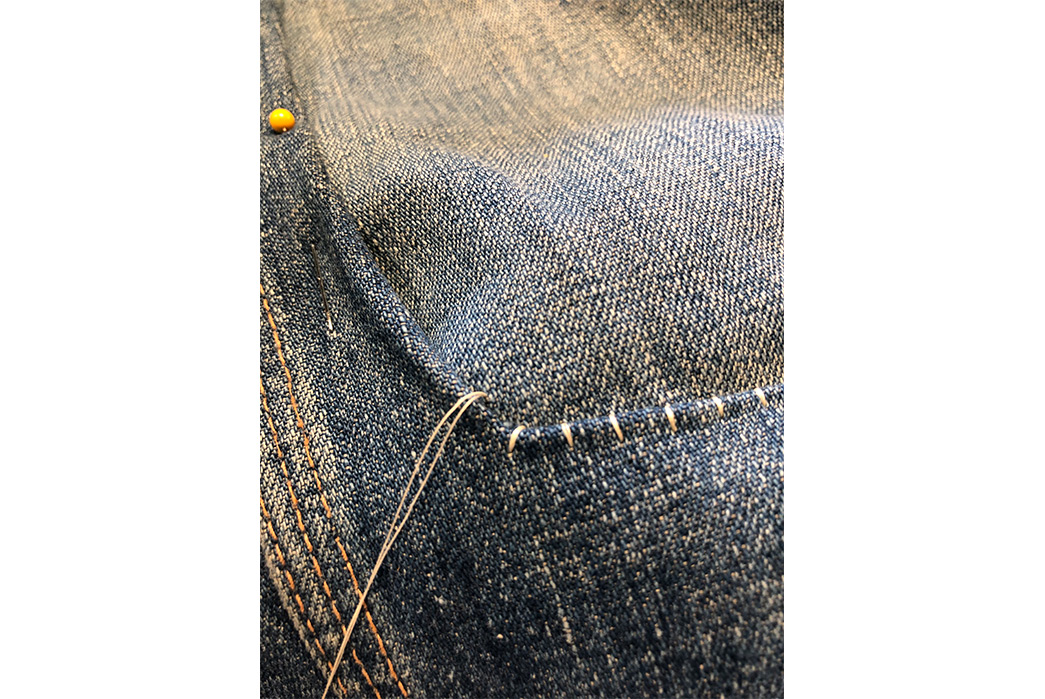
Step 10:

Now it’s time to stitch down the edges of your scrap around the whip-stitched hole. For this you’ll use a running stitch, the same stitch quilters use, but don’t quote me. Don’t ever quote me. Similarly, you’ll start with a tied-off strand feeding from the inside out, I like to start on a corner.

Once you have your thread pulled through, run your needle back into the fabric maybe a quarter to an eighth of an inch in length, then back up maybe a half an inch from where your last stroke was. Frankly, whatever size you choose for your whip and running stitch lengths is cool, this is simply how I like them, and matched the original 1950s repairs well. Once again, it’s a rinse and repeat process until you’re all the way ’round. Once you’ve made it round, though, tie the end of your thread off inside the garment and there you have it, a hand-patched repair!
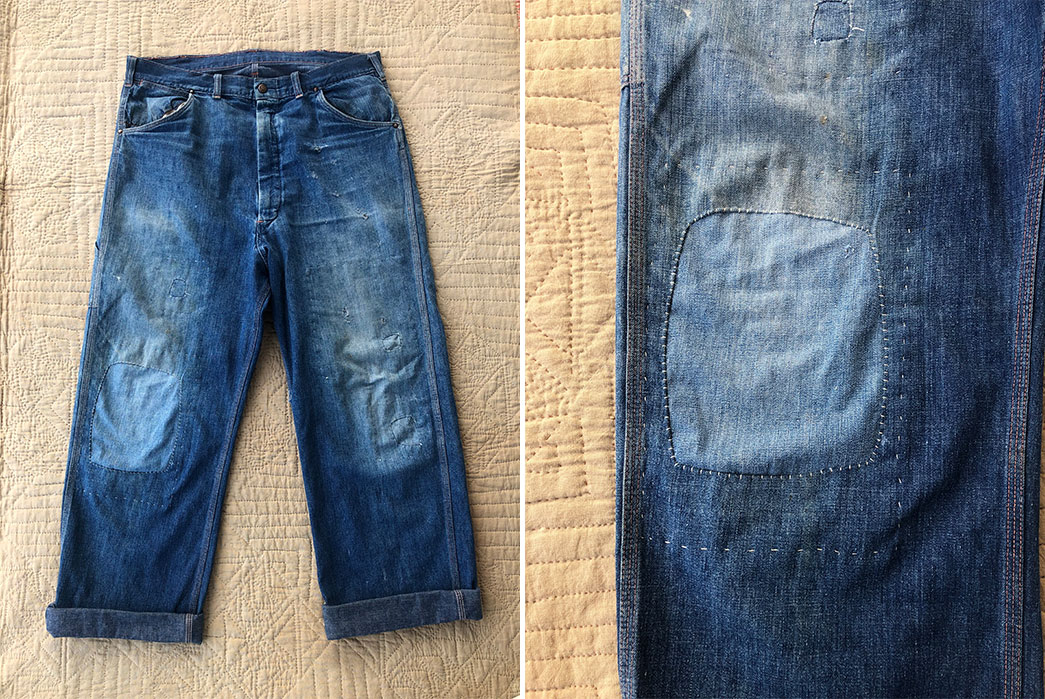
As always, have fun, take your time, and don’t be stressed about redoing a section, a tangled thread, or an imperfect stitch. Chances are your repair will hold, add character to your garment, and once you wear through it again, you can stack on another cool mend. Cheers!
If you have any questions about this repair or any other repair guides on Heddels, ask @james or @daniel in the Heddels+ Discord, who will pass your questions on to the appropriate member of the Heddels team. Be sure to share whatever hand patch repairs you get up to using this guide in the H+ Discord as well!