Before reading this, check out How to Get Into Camping Part 1: Considerations, Gear, and More
“We’re setting the tents up here.” My friend traced a line in the sand with the toe of his boot. “See that driftwood over there? The tide only comes up to that point.” The metallic clatter of tent stakes was heard as several carrying bags were dropped onto the sand. Sea breezes tried to catch the fabric as we unfurled tent flies and rolled sleeping bags and blankets to weigh our flimsy shelters down. The beach looked like a highway of sand that curved into the distance–on one side, Port Royal Sound gently lapped waves against the shore, and on the other side was a thick maritime forest teeming with mosquitos. Between us and insect-swarming hell was the gusty wind blowing from the Atlantic. This’ll work, I thought.

A vintage nautical chart of Port Royal Sound. Image via Amazon/NOAA.
It did work for keeping the mosquitoes away. We repositioned our tents before dusk so that the breeze would blow through our mesh doors as we slept, keeping us cool even in July’s subtropical humidity.

Incoming tide. Image via Z. P. Liollio.
However, I fell asleep on my heavy blanket only to wake up in a cold sweat, or rather, a cold sea. Water was pooling in small depressions on the tent floor and — before I could scoop up the first handful of unwanted seafoam — a thunderous billow of saltwater came crashing through the front door which folded the wall. Needless to say, there was a long night ahead of relocating and drying. Above us, a full moon commanded a powerful tide beneath its bleach-blonde glow. The King Tide had arrived which placed us within reach of Poseidon’s bitchslap.

Image via Nerdy By Nature/NBC.
Setting Up Your Camp

Alligators seeking some sun near a campsite. Notice that the bank is devoid of grass and features several alligator-sized ruts. They commonly slide on their stomachs into the water which wears a distinct path. Image via Greg Pollak/Facebook.
Researching your campsite is critical. As the example above illustrates, up-to-date weather (and tidal) reports can be your best friend. These reports can be hyperspecific — based on the terrain, climate, ecosystem, etc. —but the local weather service is a good place to start. No matter what, newcomers should pitch their tents at designated campsites rather than the uncharted wilds.
Moose tracks, and not the ice cream flavor. Image via bear-tracker.com/Cafe Press.
Speaking of wildlife, check for signs of animal activity in the desired area. For example, large mammals such as deer and–the much scarier–moose will leave scat, hoofprints, trails through the brush, ruts, tree rubbings, and perhaps even old antlers during certain seasons. The mating season will lead to even more activity. It varies with each species, but this delicate time of four-legged romance may lead to aggressive behavior when happening upon human campers.

For Poison Ivy and Poison Oak, remember to avoid “leaves of three.” Image via Kara Health Care.
Certain plants can attract animals as well. Wild turkeys thrive on berries and insects in the Summer, for example. These same fruit thickets can also hold ticks, which is another food source for this bird. Checking for ticks and mysterious bites after a trip should be done regardless of where your tent was set up. In terms of selecting a campsite, it’s a good idea to avoid another bane of bare skin; poisonous plants. The oils held in this type of flora spreads to the skin via contact and can cause nothing but annoyance. If you suspect that you’ve come in contact with a poisonous plant, wash the area immediately.
The above applies to dogs, too. Ticks can be a horrendous issue for your dog, and some plants can cause irritation.
Like this? Read these:

Firecraft

A keyhole-shaped fire pit dug by the author. Image via Z. P. Liollio.
When in camp, the fire never dies. From light and heat to repelling bugs and drying clothes (though not leather boots), it’s easy to see why human beings define our existence with it. Cooking over a fire, with its flame-charred taste and aroma, will be covered in the next section. Before you strike a match, remember to check if any burn bans are in effect!

A fire pit via Muddy Faces
The first task in building a fire is making a suitable pit. In some areas, digging may be impractical or forbidden so improvisation will be necessary with logs and rocks. Your pit will accomplish several things:
- It creates a physical barrier to keep the fire from spreading over the ground.
- The walls of the pit act like a lens to help concentrate the heat.
- It partially shields the fire from the wind.
The exact layout of the pit depends on the builder and the surrounding environment but I prefer one that’s oblong or keyhole-shaped. From your readied pit, here’s how to get going:
- Collect dry brush, grass, and fine twigs. If you can find some sappy wood, such as heart-pine, this burns very well. Make a compacted pile–though not compacted too tightly to prevent airflow–atop several larger sticks so that oxygen can flow up from underneath it.
- Place some firestarter against the semi-compacted mass and light it with a match. A few gentle breaths may be needed to ignite the brush.
- Start piling on more twigs with an easy hand. Be careful not to smother the fire or spread it out.
- As the burning mass grows and the heat becomes palpable, begin placing some split kindling.
- Line the edge of the pit with any wet wood found nearby so that it can dry out for future use.

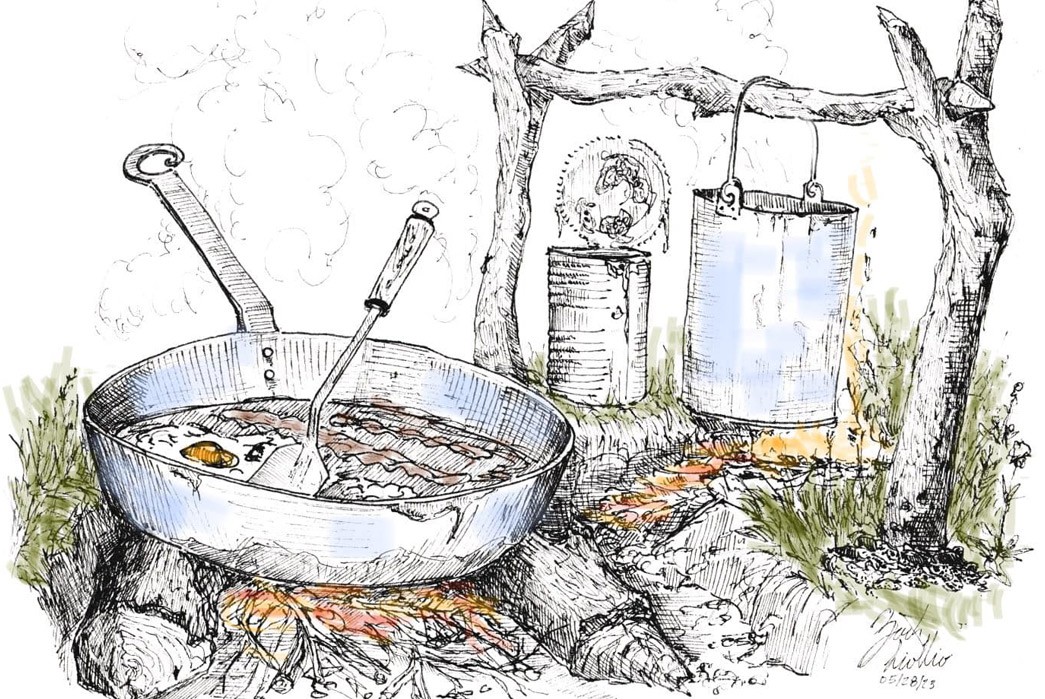
A bed of coals ready for cooking. Image via Four Seasons Fuel.
Red hot coals will form in the bottom of the pit as the fire burns. This is the good stuff! You can rake some of the coals into the elongated portion of a keyhole firepit and start cooking right away. Note that the coals produce very little smoke or yellow flames. With a portion of the coals pulled aside, a roaring fire can be used to heat water which requires a significant amount of energy compared to pan frying. Just be careful not to damage any cookware through excessive heat.
Having hot water on hand is a pro-move. So long as the coals are hot, I keep a coffee or teapot full of water on the edge of the pit. It takes less fuel to boil warm water than it does air temp liquid and a fresh cup of coffee or tea is just a few minutes away! Hot water is also useful for cleaning gear.

Image via Snow Peak
Campfire Cooking

Otto Jones (right) and Shim Swann enjoy a cowboy meal over a campfire in Texas, 1940s. Image via Traces of Texas/Facebook.
A well-rounded diet keeps your energy steady when you demand more of your body. Depending on the activities that you have planned, such as hiking or hunting, you’ll find yourself burning far more calories than taking a stroll down the street. Food not only nourishes but good food gets remembered long after the trip is over.
Breakfast

Arbuckle is a win-win for coffee and tea lovers. Their classic Ariosa blend is a favorite of mine at home while their black tea is equally as flavorful. Image via Arbuckle Coffee Roasters/Facebook.
I’m about to stir up some controversy with this take. Let me preface this by saying that I’m an avid coffee drinker. I’m even a fan of the life-shortening concoction of espresso and drip coffee known as the “red eye.” However, tea is the superior outdoorsman drink. Depending on the type, it can be less hard on your gut and still give you the caffeine needed to start your day. In addition, mixing in some honey will give you a gentle sugar boost. Green tea specifically is full of antioxidants (whatever those are). When I absolutely need coffee, I drink it in small sips.

A classic English breakfast for context. Image via I Am A Food Blog.
In keeping with tea, the English-style breakfast is accessible to almost any camper regardless of skill. I typically cook a subdued version with shelf-stable bacon, Summer sausage, the preeminent SPAM, baked beans, sliced tomatoes, and eggs (fresh eggs if you can, but powdered eggs also work). Frying the SPAM, bacon, and sausage first will help grease the pan and provide some additional flavoring for the baked beans when chunks are added to the stewing pot. Carrying some small packets of butter or oil will also come in handy for enhancing flavor and pan frying. Don’t forget salt and pepper!
Lunch

Think Charcuterie in the woods. Image via Half-Baked Harvest.
Breakfast is the big cooking event until dinner. Besides adding unnecessary weight to the stockpile of supplies, the cost of a big lunch is that daytime activities get cut short. To this end, lunch at the campsite is more of a glorified snack. Hard cheeses, spreads, buttery crackers or pilot bread, dehydrated or dried fruits and vegetables, roasted nuts, pickles, and some leftover Summer sausage make for a filling midday meal when time is short.
If a hot meal is a must, try this: lay a few sweet potatoes directly on the hot coals. As the potatoes cook, pierce or partially open a can of chili and let it heat up next to the fire. It’s important to allow the steam to vent from any canned food you try to cook otherwise you’ll have a flavorful pipe bomb. Turn the sweet potatoes every so often with a stick and after 30 minutes or so, they should be somewhat soft. Rinse them with water to remove any ash from the skin and watch them almost fall apart with caramelized perfection. Chili, cheese, and hot sauce make for excellent toppings on a hardy, no-cookware meal!
I’m hesitant to bring cakes and muffins only because they can get hopelessly crushed inside your pack. For a sweet fix, consider bringing a powdered drink mix for your water bottle.
Dinner

Chicken Bog is so important to our state, that it gets its own sign. Image via High’s Roadside/Facebook.
The last meal of the day is only limited by your imagination. You can take it to a culinary extreme that will test your ability to pack lightly or do a simple, one-pot meal like a stew.
My go-to dinner for a hungry crowd is a South Carolina staple called Chicken Bog. My version starts with a kettle of long-grain white rice that’s soaked for several hours and then hung over the fire pit. Once the rice starts steaming, some diced and lightly seared bell peppers, garlic, onions, and sausage are added along with a spoonful of butter. Prepackaged or canned chicken is fully cooked so it gets mixed in closer to serving time (along with its juice). Hot sauce, black pepper, and sea salt are my preferred seasonings. With the frying pan freed up, stir-fry some chopped cabbage and carrots to create a bit of crunch for the side dish.

A take on Chicken Bog via BigOven

It’s not camping without S’mores. Image via DoitYourselfRV
S’mores come next. This sublime sandwich of graham crackers, toasted marshmallows, and chocolate makes for a great late night ’round the campfire. Even the pickiest of eaters can’t turn down something so flawlessly sweet, so quintessential to the outdoor experience.
Cookware
A note about cast iron: it can be a double-edged sword… or a double-handled frying pan. What I mean is that while it’s a dream to cook on with its uniform heat and seasoned nonstick surface, it’s also very heavy. If your campsite allows vehicles nearby, then have at it! Rethink heavy things if you have to hike. Sheet metal is the ultimate weight-saving option.
Coffee Pot

I like old-school coffee pots that have a wire bail attached because they’re easy to move and can hang directly over the fire. There are some new kettles that are worthwhile though and Best Made makes one of them. I appreciate the size-to-weight ratio of their 44-fluid-ounce/1.3-liter behemoth.
Best Made Coffee Pot, available for $54.95 from Duluth Trading.

If you still want to be able to make pour-over coffee at camp but don’t want to weigh down your carry, this collapsable drip filter by Snow Peak is super lightweight and can even fit in a deep pocket.
Available for $40 from Huckberry.
Frying Pan

Etsy is a lifesaver when it comes to handmade quality. I bought many pans and utensils from the large outdoor stores that fell apart after a few uses. Carbon steel pans forged by blacksmiths will last generations. There’s nothing but metal to get hot, cool down, and get hot, a million times over. An 8-inch/20-cm pan is ideal for small groups or if several people in a larger crew pack cookware. A hole at the end of the handle makes it easy to tie to the back of a knapsack.
Kettle

The basic design of a camp kettle hasn’t changed in centuries. I’m proud to say that I personally know a skilled tinsmith who takes historical cookware seriously with his work. Axel Ulrich is a wealth of knowledge. This 3-gallon/11-liter example is an exacting copy based on an archaeological find!
Fort Ticonderoga Kettle, available for $60 from Hot Dip Tin.
What About Plates and Utensils?

From raiding the kitchen drawer to buying fancy multi-tool style utensil sets, the choice is yours. I’ve used both with equal success while camping. Hell, you can stir with sticks and eat with your hands if you really don’t care. Plates follow the same guidelines, though I do appreciate the old Army mess kits because they hold soups and solids.

That about does it for cooking equipment except for a few small but handy things. Semi-disposable rags or clean newsprint sheets are great for wiping cookware and plates between meals. For the stickiest and greasiest messes, used a touch of lye soap. Don’t forget a few trash bags so that you can “pack in, pack out” food waste.
Cutlery

It’s a good idea to have some metal cutlery that is both lightweight and robust. You can grab a set of camping cutlery anywhere, but the above set by Bare Bones is particularly attractive, and each piece has a hole in the handle so you can tie them all together in your carry.
Bare Bones Flatware Set is available at Huckberry for $40.

Mess Kit Fork, Spoon, and Knife Set. $21 from Amazon.
Snacking

Image via It’sDelish
“Trailmix is just M&M’s with obstacles.”
This anecdote lives rent-free in my head and it’s definitely relatable to a younger version of myself. However, I’ve seen this type of thinking in practice; eating too much of a good thing on a camping trip can make your stomach turn. Imagine your primary food source being sugar-coated chocolate candy even in the heat of the day. Talk about a miserable sugar crash. Quick snacks should provide a boost of energy without overwhelming sweetness.
High Calorie, High Protein

A depiction of Native Americans smoking meat to make jerky. Image via Country Archer Provisions.
Trail mix doesn’t need to include “obstacles.” This snack, fundamental to outdoors enthusiasts everywhere, comes an in infinite jumble of dried fruits, nuts, seeds, candies, and even meats! Historically, Native Americans ate pemmican which bound meat and fruit with fat. Making a custom blend at home —whether it’s trail mix or pemmican — is a great way to get your family involved in camping nutrition as well.
If you prefer the convenience and chewy consistency of an energy bar, there’s an equally endless variety. That said, with single-use wrappers, the trash must be packed out and thrown away later.
Beef jerky, when not added to trail mix, is an all-natural snack with ancient roots. On the spectrum of expensive snacks, it rates pretty high but it packs a protein punch. Trying to stay away from red meat? There are seafood and even vegan options.
Thriving (and Looking Good)

Industrialists Henry Ford (right) and Thomas Edison were fond of camping, or at least the idea of camping. Their arrangements were fairly posh by outdoorsman standards. Image via The New York Post.
Life is good. You’re full of fine food and your friends and family are telling stories from the day. The sun is going down as the fire flickers its soft yellow light in the cool breeze. A flask emerges — this brand of bourbon pairs well with the final bites of crispy s’more. This is thriving in the context of camping; total contentment. As you start looking through your knapsack, you begin to wonder what you’ll wear tomorrow. We have you covered in the next installment.